My favorite site is having a birthday! MouseScrappers is 2 years old and we're celebrating with a very special blog hop :)
I have a super fun and useful freebie for you as my part of the blog hop! And a little tutorial on how to use it :)
It's a Mickey Head Maker - similar to my Disney Alpha Maker - for you to use. Use it to make Mickey Heads that will match the other items that you've picked up on this blog train. You can make over 60 different mickey heads in lots of different combinations!!! (In a psd file for photoshop users or in separate png files for all other programs so everyone can use it.)
Here's a little tutorial on how to make some of your own Mickey Heads using this set:
First, in photoshop, it is super easy. Just open up the psd file in photoshop (elements or cs - it doesn't matter) and simply click on and off the eyeballs in the layers side menu to choose which layers you want showing! In this picture below, you can see that I've got the Silver Outline eyeball on as well as the red fill layer, polkadots, and crumpled layer.
Now just go to Layer, Merge Visible and it's ready to be moved onto your scrapbook page! If you want to make another one, just undo the Merge Visible and start again!! How easy peasy is that??
In all other programs, you can simply open what you want to be the bottom layer and then drag other layers on top of it. It's the same idea, you just need to decide which layers you want and put them on top of each other. Then put them all together so you can put it on your page! **The only exception to this is the crumpled layer and the striped layer. They need to be blended with your base layer. (This is already done for you in the photoshop psd file.) In other programs, you will need to change the opacity or blend it to have it look right and take the color of the base layer.
Hope you love it and it helps you create just the right Mickey Head for that special disney scrapbooking page!!!
DOWNLOAD HERE - if you get an error code, try again in a few minutes - it means the server is busy!
You should have come from KaylaLovesMinnie
Your next stop is Roxana
Or if you started here, you can go to the MouseScrappers 2nd Anniversary Activity forum to get the complete list.
People from all over the world have contributed to this blog hop so if you don't see their freebie right away, be sure to check back later!
And... if you love my mickey head maker, have a look around. I have lots of freebies on my blog and facebook. And my kits are for charity.
Thanks for comments. Others' comments and notes of appreciation are what keep me sharing!
Hugs to you,
Denise aka A Grieving Mommy
Showing posts with label Digital Scrapbooking Tutorials. Show all posts
Sunday, May 22, 2011
Happy 2nd Birthday MouseScrappers!!! Blog Hop and a Disney Digital Scrapbooking Freebie and Tutorial for making Mickey Heads!
Thursday, April 28, 2011
Digital Scrapbooking Tutorial on using Coloring Books on your Digital Scrapbooking Pages and a Mega Prize Package for joining the Challenge!
Here’s my tutorial on using Coloring Books on your Digital Scrapbooking Pages:
There are 3 steps to using Coloring Books on your pages:
The scanner that I use for coloring book pages is called a Fujitsu ScanSnap S1300Instant PDF Sheet-Fed Mobile Scanner. It is awesome. It does 10 coloring book pages at a time – both sides at once (duplex) – so really 20 pages at once. It is pretty expensive though L But any scanner will work just make sure it’s scanning at 300 dpi.
Once you have your image in the computer, you are ready to move to step #2 and extract it.
Extracting
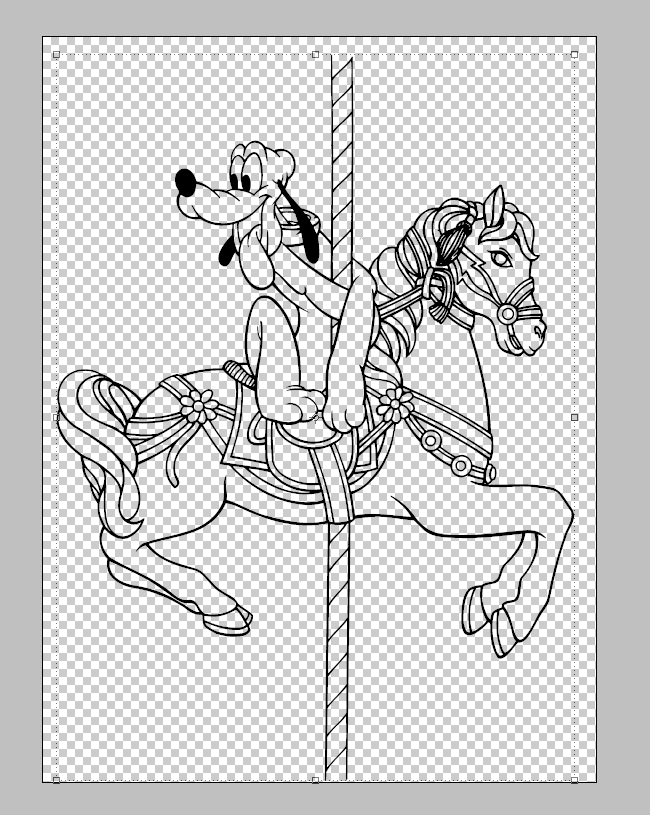
Here is what you want it to look like (removing the white part):
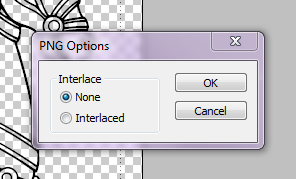
Or if you have Photoshop and know how to install and use actions, you can use my ColoringBook Action for Photoshop. It isavailable in the chat mini kit download found here. It will automatically select and delete the white part of the coloring page for you and then save it as a png and all you have to do is push the play button. This is super useful for when you are scanning and extracting a large number of pages! Find out more about installing actions and styles for Photoshop Elements at ScrapOrchard’s video tutorials by SuzyQ here. (Installing styles and actions use the same basic process.) Once you have removed the white part of the coloring page, you are ready to move onto step #3 Embellishing. (Just don’t forget to save your extracted image as a png file for future use!) BTW – when saving your image as a png file, a box will come up saying “Interlace” with choices None and Interlaced. You want to choose None. Then click OK.
Embellishing There are LOTS of different ways to use a coloring book image on your page. Here are some ideas:
Color it in.
To color in a coloring book image. You need to select the area and then fill it with a color. There are LOTS of different ways to do this. You can use the paintbucket tool. You can select the area you want to color and then go to Layer, New Fill Layer and choose the color.
The Alice, Mad Hatter, and White Rabbit were a coloring book image that I painted for this page:
Silhouettes can be really fun to use on a page. They are simply a blacked out image. You can do this easily by selecting the outside portion of the coloring book image (the transparent part outside of the image). One click with the magic wand tool will do it. Then you will want to select the Inverse so that you have all of the image selected – the inside and outline portions. You can select the inverse by going to Select and Inverse in Photoshop programs. (You could go through and select each and every part of the image but that just takes longer!) Now you are ready to fill it with black or white or any other color for that matter! You could even fill with a paper! You can paint it black, use the paintbucket tool, or go to Layer, New Fill Layer and select the color you want.
Use it as an outline.
I love to use the coloring book image as an outline but I like to add color to it. Plain old black outlines are boring to me. You could select it and paint it a color, but I prefer to use a clipping mask with this method. A Clipping Mask is when you have a layer take the shape of another layer. In this case, we want something to take the shape of the outline of the coloring book image.
So bring a paper or paint smear, or gradient and put the layer on top of the image. Next, (in Photoshop) make sure you are on the top layer, then go to Layer, and Create Clipping Mask. This will make the paper or whatever you have chosen take the shape of the coloring book outline. I have used paint smears, scribbles, masks, papers, gradients, etc. to fill coloring book outlines! Be creative. You can use more than one, overlay different ones on top of each other, or use different ones together to create your own unique effect.
I used the clipping mask method on these 2 pages (using a paintsmear on the tron monorail and multiple scribbles on the goofy one):
Other ideas that I will not go into today are making a mask or photo frame, making patterned paper using the image, or blending the coloring book image into your background or photo.
There are really endless ways to use coloring book images on your scrapbook pages!!! I hoped you enjoyed this tutorial and found it useful – please leave a comment if you did!
If you have any questions, you can contact me at agrievingmommy@yahoo.com. We are going to be in Disneyland next week, so please be patient with me getting back with you!
FAQ:
Filling the Black Outline of a Coloring Image in Better:
Sometimes, coloring book images are not printed the best and the black outline is not as dark as you’d like it to be. There are different things you can do to help this. One thing you can try is to select the transparent parts and then select the inverse (this is better than just selecting the black so that you get the transparent and white parts selected with the black) so that all of what should be black is selected. Then you can fill it with black using the Layer, New Fill Layer or paintbucket/paint tools. Another way is to try adding a stroke to the image. You can go to Edit and Stroke to try this method. There are 3 different choices for adding a stroke that you can play around with – Inside, Center and Outside.
WHEW! That was the longest post I've ever written :)
Now for the fun part - the challenge! You need to make a scrapbook page that uses a coloring book image on it. It can be one from me or one that you've scanned yourself. Post it in the MouseScrappers Gallery here and in the forum thread here! Do this by Thursday, May 5th and get a Mega Prize Package - 100 pages of coloring book images that I have scanned and extracted, ready for you to use on your scrapbook pages.And here's a freebie for you. The Miss Daisy that I scanned, extracted, and recolored. It will go perfectly with Natalie and my collab kit Huey's Uncle!
Download it here.
Hugs,
Denise aka A Grieving Mommy
I LOVE using coloring books on my scrap pages. I have over 100 coloring books and I won’t let my son or the kids in my class color them in until I’ve scanned them J he he They’re mine!
Why are they so awesome? They’re cheap – I hunt the dollar store and Walmart for them! You can get 40 pages for $1!!! Those are unbeatable prices for scrap stuff! (I’ve also got some really awesome coloring books in Disneyland and Disneyworld so always check out the stores there.) And there are just so many ways to use coloring book images on your scrapbook pages! They’re so versatile and customizable! You can choose the exact colors you want to use to match a certain kit. You can use it as a background, element, silhouette, or blend. There are just so many options!!There are 3 steps to using Coloring Books on your pages:
1. Digitizing
2. Extracting
3. Embellishing
DigitizingDigitizing your image is simply getting it into your computer! You can scan or photograph the coloring book page. (You can also do a google search for coloring book images but beware they are usually very low resolution and won’t print out well!) Photographing coloring book pages can be tricky due to lighting issues and distortion from the angle at which you photograph the page so I recommend scanning your coloring book page. The important thing is to scan your image at 300 dpi resolution so that it will be the same size on your scrapbook page (300dpi is standard for scrapbook page resolution).
The scanner that I use for coloring book pages is called a Fujitsu ScanSnap S1300Instant PDF Sheet-Fed Mobile Scanner. It is awesome. It does 10 coloring book pages at a time – both sides at once (duplex) – so really 20 pages at once. It is pretty expensive though L But any scanner will work just make sure it’s scanning at 300 dpi.
Once you have your image in the computer, you are ready to move to step #2 and extract it.
Extracting
Unless you have a coloring book image already in png format (a file that has a transparent background) in which case you can skip this step, you are going to want to remove the white background from the coloring page so that you can use it on a scrapbook page. There are a few different ways to do this. Basically, you want to select all of the white and delete it from the image. Depending on your program, you can just use a selection tool like the magic wand tool, etc. to select all of the white and delete it. (Sometimes photoshop will make you duplicate the layer before you can delete anything from it. Or it won’t turn transparent unless you duplicate the background layer – then you can just delete the background layer.) In Photoshop CS versions, you can go to Select Color Range and choose white. This will select all of the white on the page for you so you don’t have to click so many times like you would using the magic wand tool. Then you can delete the white part.
Here is what the image looks like after being scanned (usually a jpg or pdf file):
Here is what you want it to look like (removing the white part):
Or if you have Photoshop and know how to install and use actions, you can use my ColoringBook Action for Photoshop. It isavailable in the chat mini kit download found here. It will automatically select and delete the white part of the coloring page for you and then save it as a png and all you have to do is push the play button. This is super useful for when you are scanning and extracting a large number of pages! Find out more about installing actions and styles for Photoshop Elements at ScrapOrchard’s video tutorials by SuzyQ here. (Installing styles and actions use the same basic process.)
Embellishing
Color it in.
To color in a coloring book image. You need to select the area and then fill it with a color. There are LOTS of different ways to do this. You can use the paintbucket tool. You can select the area you want to color and then go to Layer, New Fill Layer and choose the color.
This is the process that I use. First I open up the kit that I want to use so that I have access to the exact colors to make the image match my page and elements. Next, I select the part I want to color by using my magic wand tool and clicking inside the transparent part. Then (because I’m picky and I don’t want a gap in between the black outline and my coloring) I choose Select then Modify and Expand to make the selection just a little bit bigger – usually 2 pixels is about right. (You can skip this step if you aren’t picky – you really can’t hardly tell.) Then I either use the paint tool to hand paint the selection (if I want a bit of variation) or I go to Layer, New Fill Layer and choose my color. I like to keep my layers separate in case I decide to change something or make a mistake, it’s easier to remove or change a layer but you don’t have to do that. Continue coloring your image. Sometimes you might just want to color their hat or a part of the image. Sometimes you want it all colored! It just depends on the look you are going for. When you are done coloring, remember to save it as a separate png file in case you want to use it again and so you don’t save over your original png image.
Here's a pic of me coloring an image using that method:The Alice, Mad Hatter, and White Rabbit were a coloring book image that I painted for this page:
Make a silhouette.
Silhouettes can be really fun to use on a page. They are simply a blacked out image. You can do this easily by selecting the outside portion of the coloring book image (the transparent part outside of the image). One click with the magic wand tool will do it. Then you will want to select the Inverse so that you have all of the image selected – the inside and outline portions. You can select the inverse by going to Select and Inverse in Photoshop programs. (You could go through and select each and every part of the image but that just takes longer!)
The Mickey on this page was a coloring book image that I turned into a silhouette:
I love to use the coloring book image as an outline but I like to add color to it. Plain old black outlines are boring to me. You could select it and paint it a color, but I prefer to use a clipping mask with this method. A Clipping Mask is when you have a layer take the shape of another layer. In this case, we want something to take the shape of the outline of the coloring book image.
So bring a paper or paint smear, or gradient and put the layer on top of the image. Next, (in Photoshop) make sure you are on the top layer, then go to Layer, and Create Clipping Mask. This will make the paper or whatever you have chosen take the shape of the coloring book outline. I have used paint smears, scribbles, masks, papers, gradients, etc. to fill coloring book outlines! Be creative. You can use more than one, overlay different ones on top of each other, or use different ones together to create your own unique effect.
This example has 2 papers clipped to it:
There are really endless ways to use coloring book images on your scrapbook pages!!! I hoped you enjoyed this tutorial and found it useful – please leave a comment if you did!
If you have any questions, you can contact me at agrievingmommy@yahoo.com. We are going to be in Disneyland next week, so please be patient with me getting back with you!
FAQ:
Filling the Black Outline of a Coloring Image in Better:
Sometimes, coloring book images are not printed the best and the black outline is not as dark as you’d like it to be. There are different things you can do to help this. One thing you can try is to select the transparent parts and then select the inverse (this is better than just selecting the black so that you get the transparent and white parts selected with the black) so that all of what should be black is selected. Then you can fill it with black using the Layer, New Fill Layer or paintbucket/paint tools. Another way is to try adding a stroke to the image. You can go to Edit and Stroke to try this method. There are 3 different choices for adding a stroke that you can play around with – Inside, Center and Outside.
WHEW! That was the longest post I've ever written :)
Now for the fun part - the challenge! You need to make a scrapbook page that uses a coloring book image on it. It can be one from me or one that you've scanned yourself. Post it in the MouseScrappers Gallery here and in the forum thread here! Do this by Thursday, May 5th and get a Mega Prize Package - 100 pages of coloring book images that I have scanned and extracted, ready for you to use on your scrapbook pages.
Download it here.
Hugs,
Denise aka A Grieving Mommy
Tuesday, March 15, 2011
A Sneak Peek! A MouseScrappers Challenge! A StashBuilder Mickey Head Prize Package Freebie!! And a Digital Scrapbooking Organization Tutorial
Come join me over at MouseScrappers. I'm hosting a weekly challenge this week and you could get a Mickey Head Prize Package for participating! Plus I've got a special freebie for my Newsletter, Facebook and Blog Followers!!!
This week's challenge is all about Spring Cleaning. I've been cleaning and organizing everything, but my biggest project has been cleaning my scrapbooking files and photos on my computer so that I can find what I'm looking for quickly and easily.
The challenge is to make better use of your scrapbooking stuff by organizing it. Then you will be able to find what you want and use multiple different things on a page as opposed to just creating a page from one kit. To participate in the challenge, you must make a scrapbook page using items from at least 4 different designers/kits. (Find the complete rules to play here at MouseScrappers.)
So here's a DigiScrappin Organization Tutorial to help you:
When I first started scrappin digitally, I just collected everything and it became this huge pile of crap - which is ironic because that's why I love digiscrappin! There's no mess - at least you can't see it - unless you look on my external hard drive of course :) So after trying lots of different ways to organize, (Some people organize by designer, some by store, some by theme, etc.) I've found a system that I really love and it's been so useful to me I thought I would share and maybe someone else will find it helpful.
When I first download and unzip a kit (I use UnZipThemAll and LOVE it), I delete the zipped files and it looks like this:
I then combine the papers, wordart, elements, etc. into one folder, removing unnecessary files and renaming some so they have a descriptive name (so that I can do a search for them if necessary - there will be a follow up tutorial on that soon).
See the kit now: (You're getting a Sneak Peek at my next Charity Kit - Warrior Princess!)
This way, I can see all the parts of a kit at once.
Now, onto the Organizing part.
I find that there are 2 different ways that I want to find my scrap stuff - by theme and by supply. Sometimes, I want a Christmas themed kit or a Boy kit. Other times, I want a staple or paperclip to add to my page.
So, that's why I have my scrap stuff organized by 2 basic categories: By Theme/Color and By Supply
When you click on my Scrap Supplies Folder, this is what you see:
Now I will show you what those 2 categories look like.
Here is the By Supply Folder:
The By Theme Color Folder looks like this:
This way, I can look for a specific themed kit or colored kit or I can look for a staple or ribbon or something else for the page I'm working on.
But it gets a little more detailed with my Disney Scrap stuff.
When you go into my Disney Themed Folder, you see another set of By Theme and By Supply Folders:
This time, when you click on Supply, I have only Disney specific supplies in this folder:
For example, here is what my Mickey Heads folder looks like inside. It's got all of my Mickey Heads from any kits that I have in one location so when I want to add a hidden mickey to a page, I can just come to this folder!
My Disney By Theme Folder looks like this. It's pretty much done by Character and Lands, etc.
Then if I'm doing a page for my son meeting Mulan, I can just click on the Mulan Themed folder and see what I have for that page.
Hope that helps! I have another tutorial almost ready for organizing that I will post in a few days too.
Back to the Challenge!
If you work on organizing and complete your page following the rules, you will get StashBuilder: Mickey Heads 1 to put in that new Mickey Head folder of yours!!
And I have another StashBuilder MickeyHeads for my Facebook, Newsletter, and Blog Followers! I will be putting this on Facebook, emailing it out to the newsletter people, and blog followers - you know you need to email me for it because Blogger does not give me a way to find you!!! Contact me at agrievingmommy@yahoo.com
Hope this Challenge helps you get a little more organized!
Sending hugs to you :)
Denise aka A Grieving Mommy
PS - Warrior Princess, my latest Kit 4 Charity will be out in just a few days!
This week's challenge is all about Spring Cleaning. I've been cleaning and organizing everything, but my biggest project has been cleaning my scrapbooking files and photos on my computer so that I can find what I'm looking for quickly and easily.
The challenge is to make better use of your scrapbooking stuff by organizing it. Then you will be able to find what you want and use multiple different things on a page as opposed to just creating a page from one kit. To participate in the challenge, you must make a scrapbook page using items from at least 4 different designers/kits. (Find the complete rules to play here at MouseScrappers.)
So here's a DigiScrappin Organization Tutorial to help you:
When I first started scrappin digitally, I just collected everything and it became this huge pile of crap - which is ironic because that's why I love digiscrappin! There's no mess - at least you can't see it - unless you look on my external hard drive of course :) So after trying lots of different ways to organize, (Some people organize by designer, some by store, some by theme, etc.) I've found a system that I really love and it's been so useful to me I thought I would share and maybe someone else will find it helpful.
When I first download and unzip a kit (I use UnZipThemAll and LOVE it), I delete the zipped files and it looks like this:
I then combine the papers, wordart, elements, etc. into one folder, removing unnecessary files and renaming some so they have a descriptive name (so that I can do a search for them if necessary - there will be a follow up tutorial on that soon).
See the kit now: (You're getting a Sneak Peek at my next Charity Kit - Warrior Princess!)
This way, I can see all the parts of a kit at once.
Now, onto the Organizing part.
I find that there are 2 different ways that I want to find my scrap stuff - by theme and by supply. Sometimes, I want a Christmas themed kit or a Boy kit. Other times, I want a staple or paperclip to add to my page.
So, that's why I have my scrap stuff organized by 2 basic categories: By Theme/Color and By Supply
When you click on my Scrap Supplies Folder, this is what you see:
Now I will show you what those 2 categories look like.
Here is the By Supply Folder:
The By Theme Color Folder looks like this:
This way, I can look for a specific themed kit or colored kit or I can look for a staple or ribbon or something else for the page I'm working on.
But it gets a little more detailed with my Disney Scrap stuff.
When you go into my Disney Themed Folder, you see another set of By Theme and By Supply Folders:
This time, when you click on Supply, I have only Disney specific supplies in this folder:
For example, here is what my Mickey Heads folder looks like inside. It's got all of my Mickey Heads from any kits that I have in one location so when I want to add a hidden mickey to a page, I can just come to this folder!
My Disney By Theme Folder looks like this. It's pretty much done by Character and Lands, etc.
Then if I'm doing a page for my son meeting Mulan, I can just click on the Mulan Themed folder and see what I have for that page.
Hope that helps! I have another tutorial almost ready for organizing that I will post in a few days too.
Back to the Challenge!
If you work on organizing and complete your page following the rules, you will get StashBuilder: Mickey Heads 1 to put in that new Mickey Head folder of yours!!
And I have another StashBuilder MickeyHeads for my Facebook, Newsletter, and Blog Followers! I will be putting this on Facebook, emailing it out to the newsletter people, and blog followers - you know you need to email me for it because Blogger does not give me a way to find you!!! Contact me at agrievingmommy@yahoo.com
Hope this Challenge helps you get a little more organized!
Sending hugs to you :)
Denise aka A Grieving Mommy
PS - Warrior Princess, my latest Kit 4 Charity will be out in just a few days!
Thursday, February 24, 2011
Mickey PaperClips - Tutorial and Special Freebie for my Followers
I want to say thank you to those of you who follow me in my journey through this blog. Mine isn't the happiest journey and I want to thank you, my digi-friends, for being there. I made this new freebie for you full of lots of fun Mickey Clips all hand made by me in Photoshop!
I will be sending this new freebie out to my newsletter subscribers and putting it on my facebook wall for my followers there. If you are a blog follower but aren't a newsletter subscriber or facebook follower, you will need to email me at agrievingmommy@yahoo.com and request it with your blogger name because Blogger often does not give me info on how to reach you. Want to get it? Become a follower on Blogger or Facebook.
And here's a little tutorial for use with these paper clips...
Want to make your paperclips look like they are actually on your paper strip? Here's a little tutorial to show you how to do that.
First, place your paperclip on your paperstrip where you want it like this:
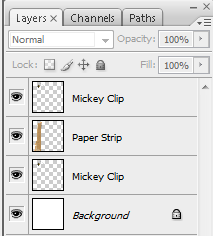
Next, duplicate the paperclip layer and move one of the layers below the paperstrip like this:
Then, choose your top paperclip layer.
Finally, making sure you have selected the top paperclip layer, erase the part of the paperclip that should be behind the paperstrip like this:
The 2nd paperclip behind the first allows you to erase easier. You can then add shadowing to the bottom paperclip layer if you'd like.
You can use this same idea with ribbon, wire, strings, etc. to get one thing to wrap around another!
Sending hugs to you :)
Denise aka A Grieving Mommy
I will be sending this new freebie out to my newsletter subscribers and putting it on my facebook wall for my followers there. If you are a blog follower but aren't a newsletter subscriber or facebook follower, you will need to email me at agrievingmommy@yahoo.com and request it with your blogger name because Blogger often does not give me info on how to reach you. Want to get it? Become a follower on Blogger or Facebook.
And here's a little tutorial for use with these paper clips...
Want to make your paperclips look like they are actually on your paper strip? Here's a little tutorial to show you how to do that.
First, place your paperclip on your paperstrip where you want it like this:
Next, duplicate the paperclip layer and move one of the layers below the paperstrip like this:
Then, choose your top paperclip layer.
Finally, making sure you have selected the top paperclip layer, erase the part of the paperclip that should be behind the paperstrip like this:
The 2nd paperclip behind the first allows you to erase easier. You can then add shadowing to the bottom paperclip layer if you'd like.
You can use this same idea with ribbon, wire, strings, etc. to get one thing to wrap around another!
Sending hugs to you :)
Denise aka A Grieving Mommy
Subscribe to:
Posts (Atom)